Quote

"I cannot live without books: but fewer will suffice where amusement, and not use, is the only future object." -- Thomas Jefferson
Showing posts with label DIY. Show all posts

Monday, June 28, 2021

Skillet: Chicken, Vegetables and Fruit Skewers

Here’s a recipe that illustrates when a recipe search takes me down a rabbit hole.

I took to calling bits of food on a stick a skewer but what was a kabob or kebab?

See notes after recipe for options gathered from various sources.

Also, this recipe uses a gift of shrimp and a salvaged food item. (See Garlic Spread post).
 
After excessive research, this is the result.
 
 
Skillet: Shrimp Skewers with Vegetables and Fruit
 

Ingredients:

A large handful of frozen shrimp in a baggie
 
Marinade: add enough lime juice, crushed dry parsley, garlic spread to coat shrimp
 
Vegetable oil
A Dab of Butter
1/4 Squash, cut into chunks
A few Canned Pineapple chunks, drained
1 Cup Cooked rice
 
 
Pre-Preparation:
Add marinade to baggie with shrimp.
Close and shake baggie to coat shrimp with marinade.
Place in refrigerator to allow shrimp to defrost and marinate for 1-2 hours.
 
 
Process:

Cook Marinated Shrimp
 
Heat skillet at medium-high.
Add butter and oil.
Add shrimp to skillet.
Stir and spread over bottom of skillet.
Cover.
Cook 2 to 4 minutes until shrimp are opaque.
Remove and reserve.

In the same skillet, add slices of squash and chunks of pineapple in remaining vegetable oil.
Cook on medium-high until browned, flip, so both sides are browned.
Remove and reserve.

Thread shrimp, and pieces of squash, pineapple onto skewer.
 
Serve over rice.
 
I know I did this backwards, usually the uncooked items are threaded onto the skewer and then cooked. Then the items are removed and topped over rice.
 
But, my skillet was too small to fit a skewer, so I just did it for looks. Plus, I enjoy using the skewer like a utensil.
 
 
I was surprised, this recipe was tasty.
 

Notes from Various Sources:

Use one of several marinates:

- lime, parsley, garlic, veg oil, pepper
- butter, paprika, salt, garlic
- lime, garlic oil, parsley, worcestershire sauce, honey, salt, pepper
 

Other Addition Options:
 
Along with individual pieces of shrimp, add one or more of these items: chunks of cheese, cucumber curls, pineapple chunks, seared squash slices, bell pepper slices, olives, seared corn on cob, sausage, or items of your choice.

Optional: sprinkle with basil and feta cheese, mushrooms, onions

Variation: marinate cucumber curls in lime juice

Other shrimp cooking methods:

- Bake at 400F for 4-8 minutes.

- Broil in the oven if you don’t have a grill. Once the broiler is preheated, place the shrimp skewers on a sheet pan coated with cooking spray or lined with parchment paper. Broil for 2-3 minutes, then flip and broil for another 2-3 minutes; watching it closely so it doesn’t over-cook.

 
Resources:


Wednesday, June 23, 2021

DIY Garlic Spread

This was a delightful experiment.

Where I live, often some of my spices like garlic powder, get clumpy, or dry and hard.

As I was cleaning out some drawers, I picked out that jar of hardened garlic powder I had hesitated to toss out. Hmmm, what if I made a garlic dressing using the hardened garlic powder?

So, I got a small jar and filled it 3/4 with vegetable oil, then I scraped the garlic powder into the jar. Next, I filled the jar with apple cider vinegar.

With the lid, I closed the jar and shook it vigorously. I did not know what to expect. What I got was something like a thick garlic spread.


It didn’t taste bad. It had a milder garlic flavor than I expected.

The first recipe I used the garlic spread was in a marinade for Skillet: Shrimp Skewers with Vegetables and Fruit. It came out great!

Great Save!


Monday, April 26, 2021

Cleaning Out the Frig

As I cleaned out the frig, it became obvious I had been saving a lot of DIY sauces and other liquid condiments.


Out of 13 jars, I wasn't sure what they all were. I could see the DIY Sour Cream, leftover pickle juice, leftover pineapple juice, leftover olive juices, DIY BBQ Sauce, leftover carry-in red sauce, and mayo dressing.
 

Thursday, January 28, 2021

DIY MIcrowave Popcorn Maker

My previous microwave popcorn "maker", a casserole dish broke. So, I had been using a cracker cardboard box to make microwave popcorn but after many uses, it bit the dust.
 
So, I checked my cardboard box stash and found another box that might work as a DIY Microwave Popcorn Maker.
 
 
I got another thin piece of cardboard and cut a piece to put inside the box on the bottom.
 
To make popcorn with your DIY Microwave Popcorn Maker*:

  • In a cup, add about 1/4 cup of kernels.
  • Add water to cover the kernels.
  • Wait about 5 minutes to let the kernels soak up some water.
  • Drain the water off the kernels.
  • Add kernels to your DIY Microwave Popcorn Maker.
  • Close box lid.
  • Microwave on high for 3-4 minutes.
  • Wait until the popping begins to stop, where you hear only 1-3 pops. Be careful the box will be hot, the contents will be hot.
  • Add popcorn to a container with a lid.
 

Basically, you add prepped popcorn to the box and microwave on high for 3-4 minutes.
 
 
Most of the time, using the prepped kernels reduces the number of unpopped kernels.
 

See Microwave: Spicy, Cheesy Popcorn for a popcorn seasoning idea.

Wednesday, January 27, 2021

DIY: Hasty Pickle Relish

I needed to use the remaining pickles from an aging batch of DIY Quick Pickles. I thought using them in a pickle relish would work.

When I searched for a pickle relish recipe, I was surprised. Most recipes were for sweet pickle relishes and the quantities were huge because the idea was to can the relish.

But, the relish I had in mind was different, was it a dill pickle relish? Search results were similar.

So, I read a few recipes. Most of the recipes included bell peppers, celery seed, mustard seed, dill seed, turmeric, vinegar, sugar, and salt. Plus, most recipes wanted the cucumbers and bell peppers ground up in a blender.

Well, this wasn't going to happen, so I was left to improvise.

Using a recent Cucumber Relish recipe as a guide, I added and deleted a few ingredients.

I choose not to add the vinegar, lots sugar or salt because I was using pickles. Plus, I did not have celery seed, mustard seed, or dill seed. I had Turmeric, but hesitated using it. Maybe another time.
 
 
DIY: Hasty Pickle Relish
(Inspired by: Cucumber Relish, Dining with the Duchess: Making Everyday Meals A Special Occasion by Sarah, The Duchess of York and Weight Watchers, p42)


Ingredients:

8 DIY Quick Pickle Spears, sliced and diced
2 TBspns Bell pepper, sliced and diced
2-4 Grinds Black pepper
8 Shakes Onion flakes
1/2 Tspn Sugar
 

Process:

In a medium container with a lid, add the pickles and bell pepper.
Add black pepper, onion flakes, and sugar.
Stir thoroughly to mix ingredients.

I had to test this relish, so I added a few spoonfuls to half a ham and cheese tarta (sandwich). It turned out great!
 

Sunday, January 3, 2021

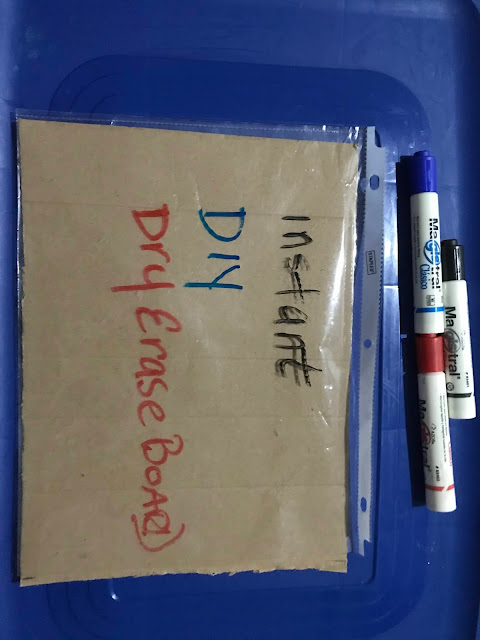
DIY: Dry Erase Board

I love dry erase boards. I have lots around my home.
So, when I saw this DIY version, I scrambled to find the materials to make one.
 
 
DIY: Dry Erase Board
 
Really, all you need is a page-sized piece of cardboard and a plastic page sleeve.
 
Put the cardboard into the sleeve and write on the surface with dry erase markers.
 
To wipe the board, clean with a slightly damp cloth.


Tuesday, December 29, 2020

DIY: Jewelry Cleaner

More from my DIY adventures. 

I may have gotten this idea from this DIY YouTube Video - How to Remove Tarnish from Silver Jewelry, not sure, but I don't use the suggested aluminum foil and my process is different.
 
 
DIY: Jewelry Cleaner
 

Ingredients:

Small glass jar or bowl
1/2 Cup hot water
1 Tspn Baking soda
Several shakes from salt shaker
 
 
Process:

Add ingredients to a small glass jar.
Stir well.
Add silver jewelry.
Stir occasionally after several minutes.
Wait a few minutes and stir again.
Check jewelry to see if they need to remain in the cleaning solution longer.
When ready, scoop out pieces and place in a cup of water.
Remove then dry and rub pieces with clean cloth.
Let items air dry before returning to storage.

Thursday, December 3, 2020

Faux Cottage Cheese

The cottage cheese here is a bit different from what I am used to. It’s a bit watery and the cheese seems like bits of cheese rather than curds.

So, I thought, I could probably make a similar DIY cottage cheese.
 
I concocted a recipe and it worked.


Faux Cottage Cheese
(Inspired by: https://www.wikihow.com/Make-Cottage-Cheese)

 
Ingredients:

Queso panela or a soft, light cheese, diced
Milk, lactose-free
1/4 - 1/2 Tsp Salt
White Vinegar
 
 
Process: 
 
In a small covered frig container, add diced / sliced bits of the cheese.
Add a dollop of milk, enough so the cheese bits are swimming in the milk.
Next, add salt and and a dollop of white vinegar.
Stir mixture thoroughly and refrigerate,


Tuesday, October 13, 2020

DIY: Coffee Stain Remover

I thank the "Gentlemen's Gazette" YouTube Channel for this idea and many more.

https://www.youtube.com/watch?v=CHzLckkSATI&feature=youtu.be

We all have our little pet peeves. One of mine is coffee in the morning. I struggled for months trying to figure how to make a cup of coffee without spillage. Sounds silly.

 I have almost nailed it. I, now, use a large commuter coffee cup with a screw on lid. But, if I did not screw the lid on in an exact manner, it would leak when I took a sip, so I have stained a lot of tops. I am more careful, now, so I usually do not have any spillage.

But, when I had a spill recently, I found the Gentlemen's Gazette's video on clothing stains and how to remove them.


Spray coffee stain with rubbing alcohol, blot with cloth, then hand wash garment.

I tried the advice for removing coffee stains and it worked!!!

Monday, October 12, 2020

DIY: Two-Tone Blouse Conversion and the Back Stitch

A simple blouse and a small success.

After retiring from desk jobs, and living in a “buy what you need culture”, it did not take long to realize I did not have many basic living / survival skills.

Besides continuing to learn how to cook, I need to Up My Game in various areas like food preservation, sewing, home repairs, saving $, understanding nutrition and health standards, and more.

So, many of the YouTube DIY Crafts videos are helpful in learning basic skills.
 
You have to admire YouTube creators, not only for demonstrating their area of expertise and creativity but also for their abilities to produce quality videos which require planning and organizing their script and tools.

To make a video also requires a wide range of skills including: writing, staging, filming, lightning, audio production, editing and more.
 
 
 DIY: Two-Tone Blouse Conversion

I got the idea for making a “Two-Tone” blouse conversion from BlueprintDIY:

https://youtu.be/h7iVt6LK_S4
 
Basically, you take two shirts or blouses and cut them in half and then sew together one piece from one shirt/blouse to the alternate half of the other shirt/blouse. But, take a look at the video for specific instructions.
 
I enjoy this shirt because I was not wearing either of the two blouses very much, so now I like wearing my two-tone blouse. I have not sewn the other halves together yet, to make another two-tone blouse.


Sewing: the Back Stitch
 
During this process, I learned a new sewing stitch, the Back Stitch. Now here is where I am going to complain a bit. While I like the DIY Craft videos, many of them make the process look simple but it's never as simple as it looks.
 
Back Stitch from Wikihow

Also, often I can't follow the steps in many of the DIY Craft videos, so I go to the internet to look for articles on the same topic like the Back Stitch and even there many articles include moving videos which drive me crazy.
 
Moving videos make me physically ill. I have to cover the moving image with my hand in order to read the text. So, even though I have offered a link to an article on how to make a Back Stitch. I had a lot of trouble following the steps due to my issues with moving images.

While I can watch a DIY Craft video or a movie like a continuous story, I can not follow the video's steps in making a craft. It is a struggle.
 
Not sure but my problem may be related to:

Tuesday, October 6, 2020

Chicken Tostados Using Leftovers

Tostados are a forgiving dish.
 
This recipe is not the classic beef and refried beans Tostado. See Resources below for traditional Tostado recipes.
 
I struggle to use up perishables and avoid waste.
 
As I surveyed the frig, I had LO carry-out chicken, lettuce, cream, black beans, corn tortillas, rice, cucumbers, cottage cheese, mixed vegs, and eggs, I knew I had to use these in a limited timeframe.
 
I planned on making pickles from the cucumbers but I was not sure about the rest.
 
Originally, I thought I’d make tortilla chips from the corn tortillas,  then the light bulb went off, no, I am going to make tostados and the rest of the ingredients fell into place.


Chicken Tostados Using Leftovers (LO)
 
Pre-Preparations:
 
You can buy pre-made Tostados and sour cream, but I choose to make DIY Tostados and DIY Sour Cream, see post below for instructions.


Ingredients:
 
Tostados
LO Canned Black beans
LO Carry-out chicken, diced
Canned Salsa
Perishable lettuce
Shredded cheese
DIY Sour cream
 
 
Process:
 
Place 1 or more Tostados on a plate.
Add a layer of black beans, drained.
Add a layer of diced chicken.
Top with 1-2 Tspns of salsa.
Add shredded or torn bits of lettuce.
Sprinkle shredded cheese over the lettuce.
Dribble DIY sour cream, to taste, over lettuce.


Yum, yum!
 
It's when I make something like this that uses sour cream do I remember how good sour cream is on many dishes.
 
Resources:
 
The Mexican Grocer
https://www.mexgrocer.com/mexcocina-may1.html
 
My Latina Table
https://www.mylatinatable.com/traditional-mexican-tostadas/

Sunday, October 4, 2020

DIY Fix: What to do with a broken Spray Nozzle

What to Do With a Broken Spray Nozzle
 
Again, this DIY craft adventure has been surprising. I save shampoo bottles, body spray bottles, cleaning solution bottles with spray, pump, and squirt tops, and more, and reuse them for various DIY cleaning solutions, diluted shampoo, DIY hand soap, and DIY hair spray, for example.

When I got tired of trying to fix the spray pump on my shampoo bottle, I went to Youtube to find repair ideas. I found some but they did not work, so I exchanged the faulty spray pump top with a dishwashing bottle squirt top.
 

Watching YouTube DIY videos and reading articles about living frugally inspires creativity and imagination.
 
I’ll try to fix the spray bottle at another time.


Friday, September 25, 2020

DIY: Crafts - Uh oh, Phase - Projects on Hold - Cardboard Earrings

DIY: Crafts - Uh oh Phase - Projects on Hold - Cardboard Earrings

While crafting, The Use What You Have approach was working great, then I fell in love with cardboard earrings and I didn't have jump rings and my skills to twist wire into jump rings wasn't working, so the potential cardboard earrings pile began to grow because I don’t think going out for jump rings is worth risking lives especially since I live in a hot zone and craft stores don’t deliver.

I am obsessed with cardboard earrings.

“Obsession - a persistent disturbing preoccupation with an often unreasonable idea or feeling - broadly : compelling motivation....”
—Miriam Webster
https://www.merriam-webster.com/dictionary/obsession

I found that postcards, greeting cards, scrap paper, photographs, maps, bookmarks, business cards, and even carry-out container stickers can be used to make cardboard earring designs.


So, if you see me staring at something, I am probably wondering if it could be used as a cardboard earring design.

Fabrics and yarn aren’t on the agenda, yet.

But, I have a secondary obsession, making cardboard stained glass earrings.


Tuesday, September 22, 2020

DIY: Patterned Paper

My DIY Crafting Adventure: Plodding Along with Patterned Paper

For two days, I have been plodding from task to task filled with disappointment because my crafting / art skills are not improving fast enough.

Plus, I have watched so many DIY Craft YouTube videos, they’ve become a muddle in my brain.

My main focus, at the moment, is boxing and wrapping the items I have completed.

Making wrapping paper wasn’t high on my list but now I find that is what I need to do.

After a rough start, I actually made some decent patterned paper to use as wrapping paper.

My first attempt at patterned paper looked more like a Rorschach test.

This is ok, I like using a variety of different sized circles, just need to make some improvements like arrangement and color choice.

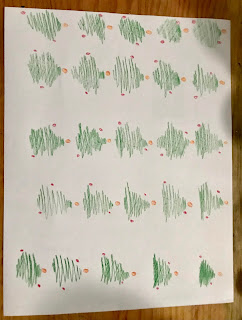
 While, I like this one, need to improve my tree doodle.


Almost got it with this one!

The previous three samples are an example of my craft supplies management. To conserve my permanent colored markers and acrylic paints, I dug out my colored pencils. They are fun to use!

On a positive note, my patterned paper disasters will be great for making paper beads!

Here are links to just two of the many DIY Patterned Paper YouTube videos I perused:

https://youtu.be/iuulm92pEv4

https://youtu.be/uyAcE12htMk


Reference:

https://en.m.wikipedia.org/wiki/Rorschach_test


Tuesday, September 8, 2020

DIY: Cardboard Earrings

DIY Cardboard earrings

Credit: https://youtu.be/f_UDijesb1A

I love the idea of making earrings from cardboard and Garlinda is so creative!

I jumped in.

My circles aren’t perfect but as I have learned, again, to learn a new task, it takes lots of practice and patience.

Garlinda’s idea of using a black magic marker to finish the edges of the discs was great.

Also, I need to remember to punch the hole in both earrings by holding them together.

Everything was going well until I got to making the punch hole and putting in the jump rings.

Then, my first pair of cardboard earrings project turned into a nightmare.

Like recipes, I never have all the ingredients or tools required. Use what you have is my approach.

I did not have a hole puncher. So, I used my wire twist earring-making tool as an awl.

While it worked well. Putting in two jump rings was almost impossible.

I have never been able to pry open a bit of a jump ring, easily, to add the earring hook. For this project, I had to find a way to pry open a jump ring enough to slip it through the hole, add another jump ring with the hook and then close it securely.

Before I partially accomplished this task, my floor was littered with jump rings that popped from my hands and I broke two fingernails. The rings are still not secure. I am going to look for an alternative solution, but I now have some beautiful cardboard earrings!

Tuesday, September 1, 2020

Microwave: Mug O'Chilaquiles

Good Morning!

Chilaquiles is a delicious Mexican dish.

Plus, you can use your leftover stale corn tortillas.

It's been a long time since I made a recipe that was perfect the first time around and often when I make the recipe again, it just never tastes as good as the first one.

My eye jumps to Mug recipes that scroll by on YouTube or Twitter, so I was thrilled to see a mug recipe for Chilaquiles.

As usual, I did not have all the ingredients the recipe called for, like sour cream, so I made my own.


Microwave: Mug O'Chilaquiles (Toast Topping)
(Adapted from: https://www.thedailymeal.com/recipes/coffee-cup-chilaquiles-recipe )


Pre-preparation:

Ingredients:

Leftover corn tortillas
Cream
Apple cider vinegar
1 slice of multi-grain bread


DIY Tortilla Chips

Use leftover corn tortillas.Spread tortillas over on a microwaveable plate.
Microwave on high 2 minutes.
Remove.
Turn tortillas over.
Return plate to microwave.
Microwave on high 1-2 minutes.
Remove.
When tortillas have cooled, break them into small pieces.
Save unused tortilla chips and pieces in a closed container.


DIY Sour Cream

In a refrigerator container with a lid, add 3 TBspns of cream.
Add 1 TBspn of apple cider vinegar to cream.
Stir cream and vinegar together.
Cover and store in frig for 10-30 minutes.

Make toast.


Ingredients:

 
1 egg
2 TBspns milk
Ground black pepper
3 Drops hot sauce
3 TBspns mozzarella or monetary jack cheese, shredded
1 Tspn Dry onion flakes
Handful of DIY tortilla chips, broken into small pieces.
3 TBspns canned salsa, drained
Toppings: Mayo, DIY Sour cream, Dry parsley or cilantro (optional)


Process:

 
In a microwave-safe mug:
Add egg.
Add milk.
Add black pepper.
Add hot sauce
Whip together with a fork.

Add cheese and onion flakes to the egg mixture.
Stir.

Add tortilla chips and salsa.
Stir.

Microwave on high for about 2 minutes, or until cooked through.

Spread mayo over toast.

Add egg mixture to top of toast and spread over surface of toast.

Garnish with about 2 TBspns of sour cream, and sprinkle with parsley or cilantro.


Wednesday, August 26, 2020

DIY: Flowers and Bangles from Waste Materials

When I look at the items I try to save and/or reuse, I find I saved lots of TP rolls, cans and jars, carryout containers, advertising phamplets, travel magazines, newspapers, milk and juice cartons, and more.

Once this DIY project began, the carry-out containers were great as a places to let a variety items dry in various stages of preparation, all around the salon.

The cans and jars helped sort the bits and pieces, including lots of bread bag twists.

Then, I started to look for projects to use these items.

I am not one of those people who has to look trendy, I tend to favor off-beat ideas. Many of the flower ideas were appealing and I like bangles, so, I will probably be making lots of these items.

I was amused. In just a few days, I went from struggling to make one newspaper roll to feeling like a pro.

Credit: Large newspaper flowers
https://youtu.be/mzmzk_q0LR4

Large Flowers

While the artist uses newspaper and watercolors, I did not have any watercolors, so I choose to use magazine paper, it is a bit heavier and has more color.

Used a TP roll to cut out front and back buttons. Cut bits of colored paper to color “button.” Used a bit of twisted bread bag tie to secure the front and back of the button.

Made 2 flowers and 1/3 of a jar of confetti for future party favor projects.

I really like these flowers! They are large, colorful, and easy to make.

Can you feel my confidence growing?


Bangles 

Credit: Newspaper Bangles
https://youtu.be/Xprt1Bnh5ac

Magazine Paper Bangles
https://youtu.be/G1jqHLYUfgY

After looking at so many DIY videos, I am not surprised, I confused two videos and adapted their ideas into my own creation.

Again, one artist uses decorative "wallpaper" to customize her bangles, and the other artist uses newspaper and ribbon to make bangles.

I choose to use two types of paper, one, magazine paper for the shape, and two, a glossy menu pamphlet from my “memorabilia” collection, from one of my trips, for a ribbon-like decoration.

I used one of my bangles in my search for a jar or container to use to shape the size of the bangle.


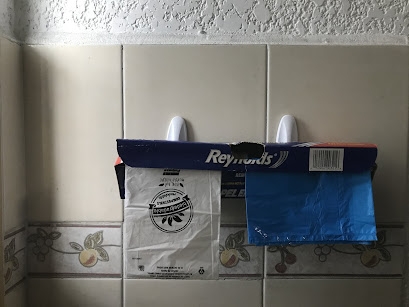
DIY: Garbage Bag Dispenser

Rolling along, got the idea from this video:

https://youtu.be/UPs-jBdYKPU 

I used an empty wax paper dispenser and taped over the “saw” edge. 

Then, I tried to determine where make the cuts in the back of the box by eyeballing it. I made the cuts, then after marking the top of the box to indicate where the holes were, I used the box to determine where to affix the hooks. 

Unfortunately, I had to glue the hooks to the wall, after affixing the adhesive backs alone, they fell off the wall in a few minutes. 

Glued the hooks and waited an hour then hung the box. 

Got to be gentle with the box when I pull out a bag.