Quote

"I cannot live without books: but fewer will suffice where amusement, and not use, is the only future object." -- Thomas Jefferson

Tuesday, September 1, 2020

Microwave: Mug O'Chilaquiles

Good Morning!

Chilaquiles is a delicious Mexican dish.

Plus, you can use your leftover stale corn tortillas.

It's been a long time since I made a recipe that was perfect the first time around and often when I make the recipe again, it just never tastes as good as the first one.

My eye jumps to Mug recipes that scroll by on YouTube or Twitter, so I was thrilled to see a mug recipe for Chilaquiles.

As usual, I did not have all the ingredients the recipe called for, like sour cream, so I made my own.


Microwave: Mug O'Chilaquiles (Toast Topping)
(Adapted from: https://www.thedailymeal.com/recipes/coffee-cup-chilaquiles-recipe )


Pre-preparation:

Ingredients:

Leftover corn tortillas
Cream
Apple cider vinegar
1 slice of multi-grain bread


DIY Tortilla Chips

Use leftover corn tortillas.Spread tortillas over on a microwaveable plate.
Microwave on high 2 minutes.
Remove.
Turn tortillas over.
Return plate to microwave.
Microwave on high 1-2 minutes.
Remove.
When tortillas have cooled, break them into small pieces.
Save unused tortilla chips and pieces in a closed container.


DIY Sour Cream

In a refrigerator container with a lid, add 3 TBspns of cream.
Add 1 TBspn of apple cider vinegar to cream.
Stir cream and vinegar together.
Cover and store in frig for 10-30 minutes.

Make toast.


Ingredients:

 
1 egg
2 TBspns milk
Ground black pepper
3 Drops hot sauce
3 TBspns mozzarella or monetary jack cheese, shredded
1 Tspn Dry onion flakes
Handful of DIY tortilla chips, broken into small pieces.
3 TBspns canned salsa, drained
Toppings: Mayo, DIY Sour cream, Dry parsley or cilantro (optional)


Process:

 
In a microwave-safe mug:
Add egg.
Add milk.
Add black pepper.
Add hot sauce
Whip together with a fork.

Add cheese and onion flakes to the egg mixture.
Stir.

Add tortilla chips and salsa.
Stir.

Microwave on high for about 2 minutes, or until cooked through.

Spread mayo over toast.

Add egg mixture to top of toast and spread over surface of toast.

Garnish with about 2 TBspns of sour cream, and sprinkle with parsley or cilantro.


Wednesday, August 26, 2020

DIY: Flowers and Bangles from Waste Materials

When I look at the items I try to save and/or reuse, I find I saved lots of TP rolls, cans and jars, carryout containers, advertising phamplets, travel magazines, newspapers, milk and juice cartons, and more.

Once this DIY project began, the carry-out containers were great as a places to let a variety items dry in various stages of preparation, all around the salon.

The cans and jars helped sort the bits and pieces, including lots of bread bag twists.

Then, I started to look for projects to use these items.

I am not one of those people who has to look trendy, I tend to favor off-beat ideas. Many of the flower ideas were appealing and I like bangles, so, I will probably be making lots of these items.

I was amused. In just a few days, I went from struggling to make one newspaper roll to feeling like a pro.

Credit: Large newspaper flowers
https://youtu.be/mzmzk_q0LR4

Large Flowers

While the artist uses newspaper and watercolors, I did not have any watercolors, so I choose to use magazine paper, it is a bit heavier and has more color.

Used a TP roll to cut out front and back buttons. Cut bits of colored paper to color “button.” Used a bit of twisted bread bag tie to secure the front and back of the button.

Made 2 flowers and 1/3 of a jar of confetti for future party favor projects.

I really like these flowers! They are large, colorful, and easy to make.

Can you feel my confidence growing?


Bangles 

Credit: Newspaper Bangles
https://youtu.be/Xprt1Bnh5ac

Magazine Paper Bangles
https://youtu.be/G1jqHLYUfgY

After looking at so many DIY videos, I am not surprised, I confused two videos and adapted their ideas into my own creation.

Again, one artist uses decorative "wallpaper" to customize her bangles, and the other artist uses newspaper and ribbon to make bangles.

I choose to use two types of paper, one, magazine paper for the shape, and two, a glossy menu pamphlet from my “memorabilia” collection, from one of my trips, for a ribbon-like decoration.

I used one of my bangles in my search for a jar or container to use to shape the size of the bangle.


DIY: Garbage Bag Dispenser

Rolling along, got the idea from this video:

https://youtu.be/UPs-jBdYKPU 

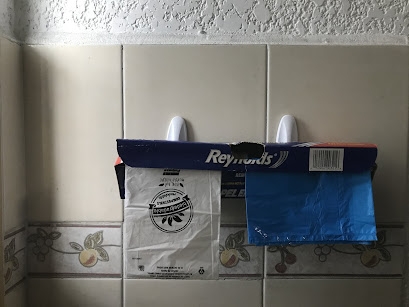
I used an empty wax paper dispenser and taped over the “saw” edge. 

Then, I tried to determine where make the cuts in the back of the box by eyeballing it. I made the cuts, then after marking the top of the box to indicate where the holes were, I used the box to determine where to affix the hooks. 

Unfortunately, I had to glue the hooks to the wall, after affixing the adhesive backs alone, they fell off the wall in a few minutes. 

Glued the hooks and waited an hour then hung the box. 

Got to be gentle with the box when I pull out a bag.


Tuesday, August 25, 2020

DIY: Glitter Water Bottle

Credit: http://www.kidsomania.com/diy-magic-bottles-of-water-and-confetti/ and https://www.youtube.com/watch?v=xCaI-5WVRlY&feature=youtu.be


I had fun making this.

My motto "Use What You Have" came into play, here.

The instructions called for colorful rubber bands. I happen to have a set of NPS special rubber bands in the shape of NPS symbols.

No glitter, so I cut up some aluminum coverings from empty pill packages, instead. I challenged myself to cut these little tabs into pieces as small as I could cut them.

No food dyes, I am still working on making some natural dyes. My spinach green was too light.

Used hand bacterial gel in place of glycerin. Also, I used more than I thought the original hack suggested.
 
I dropped in a variety of beads from my jewelry craft box.

My kitchen is a strange place now, part kitchen, part chemistry lab. I worry I might use the DIY jewelry cleaner as dressing.


Monday, August 24, 2020

DIY: Plastic Cup Coasters - Use Caution

Caution: "Baking" plastic releases chemicals into the air.


I tried the plastic cup coaster hack at:

https://youtu.be/qtPeeCgayRU

2:23

I don’t consider plastic cups “waste” because I wash and reuse them but was curious about this process.

I placed wax paper on my toaster oven tray before I baked the cup.

I baked one cup at 400 degrees for 2-5 minutes. It was quick, but I kept waiting for the cup to flatten out further. I pulled it out before it began burning.

It never flatten out enough to become a coaster.


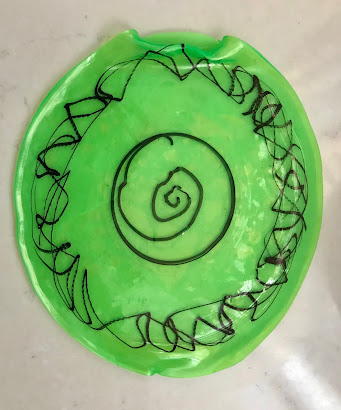
I tried it again with a lighter weight plastic cup. This time I oiled the wax paper because I wondered if the cup got stuck on the wax paper and could not flatten out.

While it flattened out better, parts of the edge were uneven. It could be used as a coaster but its imperfections made it unattractive.


Boy, that statement says a lot. That I would find imperfections unattractive, whew!

I know we seek symmetry in all things. But, imperfections is part of our DNA, it's what makes each of us different.

Got to learn to love the imperfections.

Oh, I won't be making any more plastic cup coasters, the kitchen smelled strongly of chemicals after only "baking" two plastic cups. I have no idea what chemicals were released into the air but I don't think they are good for your health.


DIY: iPhone Stand

There are dozens of iPhone stand / tripod hacks.

I chose the coffee carry-out cardboard cup method and it works pretty well.

Credit:  https://youtu.be/TTtJovKtujo


Saturday, August 15, 2020

DIY: Bag Closure Clasp

When you shop these days, in my experience, and you find an item you like, you stock up because the item may not be restocked in the future.

I had bought a few bag closure clasps and really liked them. I do use them but they are too long for some bags and I had not seen any more bag closure clasps in the stores.

So when I saw a plastic straw bag closure clasp hack in a DIY Crafts/Hack YouTube video, I decided to give it a try.

I get a lot of ideas from "5 minute Crafts" videos, this idea may have come from one of their videos.

Basically, you slice the straw open by cutting one side.

Then, you fold the bag closed and slide the slit straw over the fold and store the package.

Because I was using a small straw, I struggled a bit sliding the straw into place.