Quote

"I cannot live without books: but fewer will suffice where amusement, and not use, is the only future object." -- Thomas Jefferson

Thursday, January 15, 2015

My Tightwad Kitchen Gadgets

In my departmento, I have a microwave, a two-burner electric stove and a crockpot.

Being a tightwad is always a challenge. Cooking in a small kitchen without an oven and other kitchen gadgets like a blender is also a challenge. Add in the unique characteristics of my kitchen gadgets and this compounds the challenge to cook inexpensively, healthy and tasty.

The microwave has only one temperature setting: high, and one way to set the time, push the red button to get one minute each time you push the button.

With finicky settings and I am beginning to think the burners on the two-burner electric stovetop transfer heat differently, using the electric stovetop is always a surprise. Liquids boils at half the settings. Finding simmer is still a mystery.

The wide range of kitchen gadgets that you can buy is endless. But, as a tightwad, I am always seeking ways to work with what I have.

Below are my kitchen gadgets. My two favorite gadgets are the handheld grater and my commuter coffee mug.

The grater is easy to use, easy to clean and easy to take apart and to put back together, so I love to grate cheeses and vegetables. The commuter coffee mug is one of my favorite thrift store finds, probably cost about a $1. But, I use it as a mocktail shaker most of the time.

My wooden cutting board is really solid. I use it to crush peanuts, cereal, ice, and other things for various recipes.

Surprisingly, I bought a melon ball scooper to use as an ice cream scooper but use it to scoop out apples and to make mini-meatballs.

The spatula is useful to get those last dregs and drabs out of jars of mayo, peanut butter and the like as well as scraping bowls to get the last of a mixture.


I use a coffee cup and spoons for measuring out ingredients.

The funnel can be used for many things. I often use it for making my own sodas.

I save plastic bottles. Fill a clean bottle with club soda and add a flavoring, as little or as much as you want depending on your tastes, like making a Spritzer. Below are just a few ideas for some Spritzer flavorings:
  • cold tea,
  • soft drinks, I like making a diet soda spritzer because I get the flavor and a bit of caffeine;
  • fruit juices, fresh or from a container;
  • concentrates, like lime, jamaica, horchata or others;
  • canned fruit juice;
  • coffee;
  • powdered drink mixes;
  • liquid drink mixes like Pina colada or coconut creme.

Updated 7/23/2015

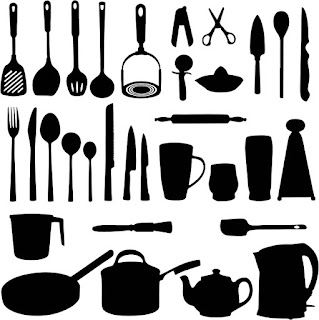
Often, I wonder what does X kitchen utensil look like or what is it's name? So, I research it.

The first utensil, top row, left to right is a "Slotted Turner."

For some reason, I think it should have a different name. Now, I know why I am confused. The "Turner" is also called a "Spatula." But, then what is the utensil, second row from the bottom, first utensil from the right. I call it a "Spatula."

More research is required.


Kitchen Utensils Artwork from: https://openclipart.org


Tuesday, January 13, 2015

Expresso de Arte & Casa Maryposa - Two new cafés

I was out on errands and found two new cafes. I was delighted.

I did not have the opportunity to try the menu at Expresso de Arte on Calle at 62 #445 x 53 y 51 in Centro but the decor was lovely.

The cafe is large and the menu includes Fetuccine Alfredo, Pannis y Ensaladas, smoothies, frappes and more. The café is open Lunes a Sábado 10:00 am to 10:00 pm.


Then, as I returned home, I saw a new cafe, Casa Maryposa, had opened near me. I decided to take a peek. The decor was heavenly with a butterfly theme. Lots of places to sit and a jardin in the back.


I wasn't hungry but decided to have a beverage. The menu ran from nachos to Fajitas, and had a wide selection of beverages and desserts. I got a chocolate frappe. Nothing cools you off like an ice cold frappe.

The owners were pleased to talk about their café because they had only been open about a week. They use fresh ingredients in their menu items.

The owners were kind enough to give me a sampling of their desserts.


Oh yum, I could not remember the last time I had such delicious desserts. The cookies are fantastic. The Banana Bread is great and the Spice Cake, moan!, it's really good.

Casa Maryposa is so close to my apartment, I can roll out of bed and have Banana Bread or Cookies, or Spice Cake!!!!

Casa Mayrposa
Calle 62 #360 x 41 y 43
Colonia Centro
Martes - Jueves 11:30 - 7:30
Viernes - Sábado 11:30 - 6:00

Facebook page to launch soon. "Casa Maryposa"


Sunday, January 11, 2015

Choosing a Book Cover Designer

Ok, you've written the best story you could. Maybe you had some beta-readers give you feedback. Maybe you got it professionally edited. Now, you feel you are ready to publish your story but you need a cover.

Many say that a great book cover gets you the attention you deserve. I agree, I do think a professional-looking book cover is important.

The question is do you contract the services of a Book Cover designer or DIY (Do it Yourself). Obviously, that is up to you. Research your options. Below are some resources.

Mark Coker, founder of Smashwords, an online publishing service, offers a free Style Guide which has information on creating a quality book cover and steps to get a list of book cover deigners to find an artist to help you.

Besides writing my novelette which included a lot of research on various topics, I had to pick a book cover designer from dozens of possibilities and it was a learning experience.

I searched online. I used Mark Coker's artist list.

After interacting with several book cover designers, I learned: designers have different styles, different prices and to my mind, different customer service skills. Just looking at their website can tell you alot about the deisgner, not only about their style but about their customer service approach.

Look at a few book cover designer's websites to get an idea of the range of styles.

Look at the book cover artists samples and if possible testimonials.

It is helpful if you find some book covers you like, so you can communicate with the book cover artists. You may need to learn some new terminology about typefaces, the type and size of image files you will need not just for your ebook cover but for your website and more. If you are creating a cover for a POD, you will need back cover information like a book summary, reviewer quotes, and a spot for a barcode.

Once you find a few book cover designers you like, contact them, usually through email. Look at their response to see if they have taken the time to be clear about their turnaround times, costs, number of proofs and more.

I found several book cover designers' replies were off-putting. One designer did not even have an email, you had to use a contact form. I felt that made the artist inaccessible. Also, I would not use a designer who did not offer multiple forms of contact including a mailing address.

Method of payment for services is another thing to consider. When I was looking for a book cover designer, my only payment method was by check and that did not work for some designers.

Price was a factor because I had limited funds. Plus, some artists' style did not suit my story.

But, I got lucky, my book cover designer and I worked well together. I think Jolenene Naylor produced great covers for Gina's Dream/El Sueño de Gina. I am not an artist but Jolenene made it fun letting me select various elements for the cover.

Unfortunately, I do not think Jolenene is taking any more clients, but you can check her site for updates.

For my second book, Recipes from the Kitchen of a Frugal Non-Cook, I did it all myself, including making a good looking book cover using Apple's Pages software. One article by Michael Canfield helped me make the cover.


Also, encouragement from Ted Summerfield's free marketing guide, The Backward Approach to EBook Success helped me in my struggles to make my own book cover.

I don't want to make it sound easy. For me, it wasn't. Lots of research and countless attempts trying a wide variety of approaches took a lot of time and effort but the result was worth it.

Note: The RKFNC cover artwork is from Wikipedia Commons and I followed the credit guidelines.

Updated 1/15/2015

Thursday, January 8, 2015

Set Your Own Price on Works by Ria Stone

I started publishing with Smashwords, a great site for new authors, in 2013. Founder, Mark Coker offers great advice on writing, formatting and marketing your eBook.

The Smashwords author dashboard is chock-full of choices. One important choice you will make is setting the price for your works. Smashwords' graphs give you an idea of the fees, and royalties you would receive to help you make a choice.

One pricing choice is letting the reader set their own price.

So, I altered the prices on my two books: Recipes from the Kitchen of a Frugal Non-Cook (RKFNC) and Gina's Dream, the first edition, (English only/eBook) to the Readers Choice.

As you can see by my posts, researching and writing RKFNC was fun. So much so, I am working on another cookbook for non-cooks.

I can't boil water but Amy Dacyczyn's Tightwad Gazette challenged and encouraged me to learn to cook and to shop economically.

Learning to cook is like learning a foreign language. I still feel like an alien in the kitchen. I mean what does "braise" or "roux" mean? I still don't know.

One appliance that saved my budget and gave me confidence was the crockpot. After several successes, I began to collect recipes I had adapted. 

After publishing Gina's Dream, I polished up those recipes, researched, cooked and tested many more to create RKFNC.

I am developing a passion for recipe research and adaptation. Remember, all I have is a finicky, electric two-burner stovetop, a crockpot, and a microwave with one setting: high. So, not only do I have to modify recipes in terms of portions, I also have to adapt the recipe for the stovetop, crockpot, or microwave.

Gina's Dream is an attempt to tell a "normal" love story with one exception, Gina is an alien. Gina's Dream is also a manifesto, a call to action. People need to start making changes in order to save our planet and ourselves. I can't believe people do not want to survive.

Researching, writing, and marketing Gina's Dream was fun and a major education in publishing.

There are tons of stats out there regarding publishing. One statement runs like this "50% of eBook authors make less than $500 a year." -- (Ted Summerfield) 

It is important as an author to do research and stay grounded in reality, at least for the bookkeeping.

Visit Smashwords and take a look at RKFNC and Gina's Dream. I hope you enjoy them.

Wednesday, January 7, 2015

Basic Stovies

Basic Stovies

I could not find the source of my original recipe. I found plenty of other recipes like this one from All Recipes:

http://allrecipes.com/Recipe/Stovies/

While the basic Stovies recipe is boiled potatoes mixed with cooked onions and corned beef, when I found this recipe, it seemed simple and I could make variations of it later. As usual, I had to my  "Use What I Have" method.


Here's the original recipe:

8 red potatoes, peeled and cut in half vertically
salt and pepper to taste
1/2 cup butter
Place potatoes halves in a pot with 1/2 inch water or milk
Season potatoes
Cook on medium heat for 15-40 minutes

Here's my revised recipe:

Electric Two-Burner Stovetop Version:

Ingredients:


2 medium, white Mexican potatoes, peeled and cut in half vertically
about a cup of milk and water mix
1/2 cube of chicken bullion
black pepper
garlic salt
a dab of olive oil

Instructions:

add milk and water to pan to fill with 1/2 inch of liquid.
add chicken bullion and stir.
set potatoes in broth.
season with black pepper, garlic salt, and a dab of olive oil.
cover.
cook on low for 15-40 minutes until done.
check to make sure they don’t stick.


Microwave Version:

I had 1 potato and the leftover broth from making the stovies. I poured the broth into a glass casserole dish; cleaned and peeled the potato and placed the two halves in the broth and seasoned. I cooked the potatoes in the microwave for 15 minutes and it came out --- drum roll -- Perfect!!!


Monday, January 5, 2015

Mac & Cheese Stuffed Apples with Bonuses -- Updated

Mac & Cheese Stuffed Apples
(Adapted from: http://domestikatedlife.com/2014/10/04/mac-and-cheese-baked-apples/)

This was an interesting recipe to adapt for my kitchen.

I usually cook for one. Plus, I do not have an oven, so I have to convert portion size/ingredients and baking times to microwave times.

I had two apples, I had been meaning to use for something. Where I got the idea to look for stuffed apple recipes I don't recall but I found this Mac & Cheese Baked Apple recipe and it looked like something I could do.

Ingredients:

Pasta, 1 small bag of ribbon pasta
2   dollops olive oil
3   Tblspn flour
1   Cup milk
2  Tblspn parmesian cheese
1  cup grated cheese (I used gouda)*
s/p to taste
2 red apples

Directions:

Pasta

Cook pasta according to package.
Add a dollop of oil to water to help keep the pasta from sticking together later.
When done, drain pasta in a colander.

Cheese Sauce

In a large saucepan, add 1 dollop of oil.
Cook at medium heat.
Add in flour and stir until smooth.
Gradually add milk, stir, and cook until the sauce thickens.
Add parmesan and grated cheese.
Stir until sauce is smooth.
Add pasta to sauce.
Stir until pasta is fully coated.
Season with s/p to taste.

*The original recipe called for a sharp cheese. I used Gouda cheese and it seemed bland in this mac & cheese. 


Apples

Slice off about a 1/2 inch of top of apple. Save it to use later as a lid.
Using a melon ball scoop, scoop out the inside of the apple to create a deep, wide hole for the mac & cheese.
Fill apple with mac & cheese. Pat it down with a spoon. Fill to the top.
Place apple "lid" on top.


Microwave 6 minutes on high.
Remove from microwave.
Remove apple "lid" and spoon or pour juices over apples.

I cut my apples in half vertically and then into fourths.


Bonuses

With this recipe, there was plenty of mac & cheese leftover for other meals. Also, I could not throw out those apple ball cores, so I decided to make a dessert based on the Apple Crisp recipe in Recipes from the Kitchen of a Frugal Non-Cook.

Apple Ball Core Dessert

apple ball cores from two apples
6  tspn oatmeal
1 1/2 tspn sugar
3 tspn flour
2  tspn butter
cinnamon

With the apple ball cores in a bowl, add additional ingredients. Make adjustments to the ingredients to suit your situation.
Stir mixture until apple core balls are coated.
Sprinkle with cinnamon to taste preference.
Microwave on high for one minute or until apples are soft and warm.

Guess what, no disasters!

Saturday, January 3, 2015

Easy Quesadillas

Easy Quesadillas
(adapted from: http://www.simplyrecipes.com/recipes/quesadilla/)

This recipe was another "Use What You Got" recipe. About all I had were tortillas, cheese, radishes, two apples, onions, carrots, a squash, and a yogurt (not counting some canned goods).

Also, I was in a hurry, so, it was time to learn how to make Quesadillas.

While it easy to make these Quesadillas, you need to be fast because the Tortilla will cook quickly. I use an electric stove top, so once it gets hot, it's really hot and turning it down seems almost impossible.


Ingredients:

1-2 dollops olive oil
4  flour tortillas
4  Tablespoons grated cheese (I used Gouda.)
4  Tspns olives (no pits), sliced
4  Tspns mushrooms, canned
black pepper per taste.

Note: Tspn = Teaspoon


Instructions:

Gather ingredients before you start.
Grate cheese and slice the olives.
Place ingredients on a plate for easy access.


Picture shows ingredients for one Quesadilla
  1. Add a dollop of oil in a small skillet.
  2. As oil begins to get hot, add one tortilla.
  3. Flip the tortilla so both sides are lightly-coated with oil.
  4. Flip the tortilla so both sides get a slightly brown.
  5. As the tortilla begins to puff up, add 1 Tablespoon cheese to one-half of tortilla.
  6. Top the cheese with 1 Tspn of olives.
  7. Add 1 Tspn of mushrooms.
  8. Sprinkle with black pepper.
  9. Then fold the tortilla.
  10. It should be done in seconds.
  11. Check to see if the underside is brown.
Remove Quesadilla, place on plate and start with the next tortilla. If needed, add a little more oil to the skillet.


Tortilla is puffing up.
Add ingredients on one side of Tortilla


Fold Tortilla
Fini!, It's Done.


There are many different recipes for Quesadillas. Some with lots of fillings. Some with side condiments. Buen Provecho! (Enjoy your meal!).