Quote

"I cannot live without books: but fewer will suffice where amusement, and not use, is the only future object." -- Thomas Jefferson
Showing posts with label Use What You Have. Show all posts

Sunday, October 4, 2020

DIY: Easy Creamy Honey Mustard Dip

With guidance from the recipe below, I used an almost empty honey jar and made a creamy honey mustard dip.
 
 
DIY: Easy Creamy Honey Mustard Dip
(Adapted from: https://www.thespruceeats.com/mustard-mayo-dip-3056312)


Ingredients:

3 Heaping TBspns Mayo
1 Tspn yellow mustard
2 Tspns Honey
3 Tspns Dry Parsley flakes
3 Tspns Dry onion flakes
1-2 Drops Hot sauce
A pinch Tarragon powder
Ground black pepper, to taste
1/4 Capful of lime juice concentrate

Options: add Horseradish and / or Worcestershire sauce

Add ingredients into a jar and stir well to thoroughly mix the ingredients.

Refrigerate when not using the dip.


Friday, September 25, 2020

DIY: Crafts - Uh oh, Phase - Projects on Hold - Cardboard Earrings

DIY: Crafts - Uh oh Phase - Projects on Hold - Cardboard Earrings

While crafting, The Use What You Have approach was working great, then I fell in love with cardboard earrings and I didn't have jump rings and my skills to twist wire into jump rings wasn't working, so the potential cardboard earrings pile began to grow because I don’t think going out for jump rings is worth risking lives especially since I live in a hot zone and craft stores don’t deliver.

I am obsessed with cardboard earrings.

“Obsession - a persistent disturbing preoccupation with an often unreasonable idea or feeling - broadly : compelling motivation....”
—Miriam Webster
https://www.merriam-webster.com/dictionary/obsession

I found that postcards, greeting cards, scrap paper, photographs, maps, bookmarks, business cards, and even carry-out container stickers can be used to make cardboard earring designs.


So, if you see me staring at something, I am probably wondering if it could be used as a cardboard earring design.

Fabrics and yarn aren’t on the agenda, yet.

But, I have a secondary obsession, making cardboard stained glass earrings.


Tuesday, September 22, 2020

DIY: Patterned Paper

My DIY Crafting Adventure: Plodding Along with Patterned Paper

For two days, I have been plodding from task to task filled with disappointment because my crafting / art skills are not improving fast enough.

Plus, I have watched so many DIY Craft YouTube videos, they’ve become a muddle in my brain.

My main focus, at the moment, is boxing and wrapping the items I have completed.

Making wrapping paper wasn’t high on my list but now I find that is what I need to do.

After a rough start, I actually made some decent patterned paper to use as wrapping paper.

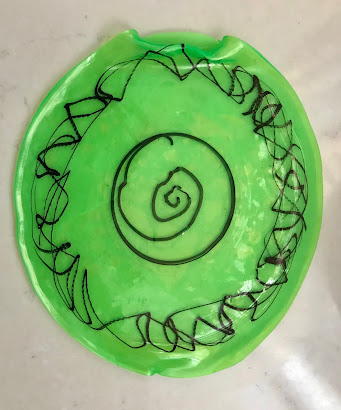
My first attempt at patterned paper looked more like a Rorschach test.

This is ok, I like using a variety of different sized circles, just need to make some improvements like arrangement and color choice.

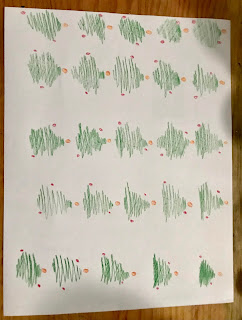
 While, I like this one, need to improve my tree doodle.


Almost got it with this one!

The previous three samples are an example of my craft supplies management. To conserve my permanent colored markers and acrylic paints, I dug out my colored pencils. They are fun to use!

On a positive note, my patterned paper disasters will be great for making paper beads!

Here are links to just two of the many DIY Patterned Paper YouTube videos I perused:

https://youtu.be/iuulm92pEv4

https://youtu.be/uyAcE12htMk


Reference:

https://en.m.wikipedia.org/wiki/Rorschach_test


Tuesday, September 8, 2020

Microwave: Mug O'Fettuccine

I had two remaining circles of spinach Fettuccine, so I decided to try to adapt a WW recipe to a mug recipe and after a second try, this recipe came out fairly well.

I had issues trying to boil the noodles, so I had to microwave the noodles one minute at a time. In my microwave, 2 minutes brings most liquids to a boil.


Microwave: Mug O’Fettuccine
(Adapted from: http://www.ww-recipes.net/2019/01/weightwatchers-)


Ingredients:

1 circle of Fettuccine
1 dab olive oil
Ground black pepper
3 TBspns canned mixed vegetables, drained
1-2 TBspns LO cooked chicken, diced
A dribble of Italian dressing


 Process:

Add circle of Fettuccine to mug.
Fill mug 3/4 with water.
Microwave in high 1-2 minutes at a time, depending on your microwave’s wattage.
Remove.
Add canned vegs.
Stir.
Fill mug 3/4 with water.
Add ground black pepper.
Stir.
Microwave 1-3 minutes in high.
Remove.
Drain, if necessary.
Add LO cooked chicken.
Stir well.
Add dressing.
Stir well.
Top with parm cheese.


DIY: Cardboard Earrings

DIY Cardboard earrings

Credit: https://youtu.be/f_UDijesb1A

I love the idea of making earrings from cardboard and Garlinda is so creative!

I jumped in.

My circles aren’t perfect but as I have learned, again, to learn a new task, it takes lots of practice and patience.

Garlinda’s idea of using a black magic marker to finish the edges of the discs was great.

Also, I need to remember to punch the hole in both earrings by holding them together.

Everything was going well until I got to making the punch hole and putting in the jump rings.

Then, my first pair of cardboard earrings project turned into a nightmare.

Like recipes, I never have all the ingredients or tools required. Use what you have is my approach.

I did not have a hole puncher. So, I used my wire twist earring-making tool as an awl.

While it worked well. Putting in two jump rings was almost impossible.

I have never been able to pry open a bit of a jump ring, easily, to add the earring hook. For this project, I had to find a way to pry open a jump ring enough to slip it through the hole, add another jump ring with the hook and then close it securely.

Before I partially accomplished this task, my floor was littered with jump rings that popped from my hands and I broke two fingernails. The rings are still not secure. I am going to look for an alternative solution, but I now have some beautiful cardboard earrings!

Tuesday, September 1, 2020

Microwave: Mug O'Chilaquiles

Good Morning!

Chilaquiles is a delicious Mexican dish.

Plus, you can use your leftover stale corn tortillas.

It's been a long time since I made a recipe that was perfect the first time around and often when I make the recipe again, it just never tastes as good as the first one.

My eye jumps to Mug recipes that scroll by on YouTube or Twitter, so I was thrilled to see a mug recipe for Chilaquiles.

As usual, I did not have all the ingredients the recipe called for, like sour cream, so I made my own.


Microwave: Mug O'Chilaquiles (Toast Topping)
(Adapted from: https://www.thedailymeal.com/recipes/coffee-cup-chilaquiles-recipe )


Pre-preparation:

Ingredients:

Leftover corn tortillas
Cream
Apple cider vinegar
1 slice of multi-grain bread


DIY Tortilla Chips

Use leftover corn tortillas.Spread tortillas over on a microwaveable plate.
Microwave on high 2 minutes.
Remove.
Turn tortillas over.
Return plate to microwave.
Microwave on high 1-2 minutes.
Remove.
When tortillas have cooled, break them into small pieces.
Save unused tortilla chips and pieces in a closed container.


DIY Sour Cream

In a refrigerator container with a lid, add 3 TBspns of cream.
Add 1 TBspn of apple cider vinegar to cream.
Stir cream and vinegar together.
Cover and store in frig for 10-30 minutes.

Make toast.


Ingredients:

 
1 egg
2 TBspns milk
Ground black pepper
3 Drops hot sauce
3 TBspns mozzarella or monetary jack cheese, shredded
1 Tspn Dry onion flakes
Handful of DIY tortilla chips, broken into small pieces.
3 TBspns canned salsa, drained
Toppings: Mayo, DIY Sour cream, Dry parsley or cilantro (optional)


Process:

 
In a microwave-safe mug:
Add egg.
Add milk.
Add black pepper.
Add hot sauce
Whip together with a fork.

Add cheese and onion flakes to the egg mixture.
Stir.

Add tortilla chips and salsa.
Stir.

Microwave on high for about 2 minutes, or until cooked through.

Spread mayo over toast.

Add egg mixture to top of toast and spread over surface of toast.

Garnish with about 2 TBspns of sour cream, and sprinkle with parsley or cilantro.


Wednesday, August 26, 2020

DIY: Flowers and Bangles from Waste Materials

When I look at the items I try to save and/or reuse, I find I saved lots of TP rolls, cans and jars, carryout containers, advertising phamplets, travel magazines, newspapers, milk and juice cartons, and more.

Once this DIY project began, the carry-out containers were great as a places to let a variety items dry in various stages of preparation, all around the salon.

The cans and jars helped sort the bits and pieces, including lots of bread bag twists.

Then, I started to look for projects to use these items.

I am not one of those people who has to look trendy, I tend to favor off-beat ideas. Many of the flower ideas were appealing and I like bangles, so, I will probably be making lots of these items.

I was amused. In just a few days, I went from struggling to make one newspaper roll to feeling like a pro.

Credit: Large newspaper flowers
https://youtu.be/mzmzk_q0LR4

Large Flowers

While the artist uses newspaper and watercolors, I did not have any watercolors, so I choose to use magazine paper, it is a bit heavier and has more color.

Used a TP roll to cut out front and back buttons. Cut bits of colored paper to color “button.” Used a bit of twisted bread bag tie to secure the front and back of the button.

Made 2 flowers and 1/3 of a jar of confetti for future party favor projects.

I really like these flowers! They are large, colorful, and easy to make.

Can you feel my confidence growing?


Bangles 

Credit: Newspaper Bangles
https://youtu.be/Xprt1Bnh5ac

Magazine Paper Bangles
https://youtu.be/G1jqHLYUfgY

After looking at so many DIY videos, I am not surprised, I confused two videos and adapted their ideas into my own creation.

Again, one artist uses decorative "wallpaper" to customize her bangles, and the other artist uses newspaper and ribbon to make bangles.

I choose to use two types of paper, one, magazine paper for the shape, and two, a glossy menu pamphlet from my “memorabilia” collection, from one of my trips, for a ribbon-like decoration.

I used one of my bangles in my search for a jar or container to use to shape the size of the bangle.


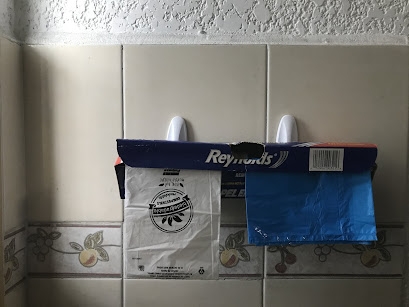
DIY: Garbage Bag Dispenser

Rolling along, got the idea from this video:

https://youtu.be/UPs-jBdYKPU 

I used an empty wax paper dispenser and taped over the “saw” edge. 

Then, I tried to determine where make the cuts in the back of the box by eyeballing it. I made the cuts, then after marking the top of the box to indicate where the holes were, I used the box to determine where to affix the hooks. 

Unfortunately, I had to glue the hooks to the wall, after affixing the adhesive backs alone, they fell off the wall in a few minutes. 

Glued the hooks and waited an hour then hung the box. 

Got to be gentle with the box when I pull out a bag.


Tuesday, August 25, 2020

DIY: Glitter Water Bottle

Credit: http://www.kidsomania.com/diy-magic-bottles-of-water-and-confetti/ and https://www.youtube.com/watch?v=xCaI-5WVRlY&feature=youtu.be


I had fun making this.

My motto "Use What You Have" came into play, here.

The instructions called for colorful rubber bands. I happen to have a set of NPS special rubber bands in the shape of NPS symbols.

No glitter, so I cut up some aluminum coverings from empty pill packages, instead. I challenged myself to cut these little tabs into pieces as small as I could cut them.

No food dyes, I am still working on making some natural dyes. My spinach green was too light.

Used hand bacterial gel in place of glycerin. Also, I used more than I thought the original hack suggested.
 
I dropped in a variety of beads from my jewelry craft box.

My kitchen is a strange place now, part kitchen, part chemistry lab. I worry I might use the DIY jewelry cleaner as dressing.


Monday, August 24, 2020

DIY: Plastic Cup Coasters - Use Caution

Caution: "Baking" plastic releases chemicals into the air.


I tried the plastic cup coaster hack at:

https://youtu.be/qtPeeCgayRU

2:23

I don’t consider plastic cups “waste” because I wash and reuse them but was curious about this process.

I placed wax paper on my toaster oven tray before I baked the cup.

I baked one cup at 400 degrees for 2-5 minutes. It was quick, but I kept waiting for the cup to flatten out further. I pulled it out before it began burning.

It never flatten out enough to become a coaster.


I tried it again with a lighter weight plastic cup. This time I oiled the wax paper because I wondered if the cup got stuck on the wax paper and could not flatten out.

While it flattened out better, parts of the edge were uneven. It could be used as a coaster but its imperfections made it unattractive.


Boy, that statement says a lot. That I would find imperfections unattractive, whew!

I know we seek symmetry in all things. But, imperfections is part of our DNA, it's what makes each of us different.

Got to learn to love the imperfections.

Oh, I won't be making any more plastic cup coasters, the kitchen smelled strongly of chemicals after only "baking" two plastic cups. I have no idea what chemicals were released into the air but I don't think they are good for your health.


DIY: iPhone Stand

There are dozens of iPhone stand / tripod hacks.

I chose the coffee carry-out cardboard cup method and it works pretty well.

Credit:  https://youtu.be/TTtJovKtujo


Saturday, August 15, 2020

DIY: Bag Closure Clasp

When you shop these days, in my experience, and you find an item you like, you stock up because the item may not be restocked in the future.

I had bought a few bag closure clasps and really liked them. I do use them but they are too long for some bags and I had not seen any more bag closure clasps in the stores.

So when I saw a plastic straw bag closure clasp hack in a DIY Crafts/Hack YouTube video, I decided to give it a try.

I get a lot of ideas from "5 minute Crafts" videos, this idea may have come from one of their videos.

Basically, you slice the straw open by cutting one side.

Then, you fold the bag closed and slide the slit straw over the fold and store the package.

Because I was using a small straw, I struggled a bit sliding the straw into place.

DIY: Reuseable Coffee Filter

Well, I have found a passion, for awhile, in some wild DIY Crafts and Hacks YouTube videos and great How-to websites.

While looking over my endless to-do lists, I found a note to look for a reusable coffee filter.

While I have a French Press, they are messy and time-consuming to clean hence the search for a reusable coffee filter, so I could make a cup or two of real coffee.

I saw the note and thought, hmmm, I'll bet I could make one myself.

After a quick internet search, I found:

https://www.wikihow.com/Make-a-Reusable-Coffee-Filter

Now, I do not recall the exact instructions. But, in my sewing crate, I found a sheet I had intended to mend. After looking at the various areas that needed mending, I decided to put the sheet to other uses.

I was in luck, the cotton sheet was a low-thread variety, so it would work for making a coffee filter.

As I followed the directions, I made a mistake. I was so proud that I used sidewalk chalk to mark the size of the funnel, I did not calculate that the filter would need to dip into the well of the funnel, so this filter would be too small.


I hemmed the diameter of the circle and realized I had a smaller funnel.


It fit it perfectly.

I made a cup of coffee and it worked great.


I saved the coffee grounds for plant fertilizer, washed the filter and hung it up to dry, ready for the next time.


Tuesday, August 11, 2020

DIY: T-Shirt Conversion - Grocery Bag

One of my favorite grocery bags was made of a stretchy cotton. So, when I saw videos about making grocery bags out of t-shirts, I jumped in.

I credit FashionbyAli's videos, again. (https://www.youtube.com/watch?v=WUEYYJcRNeI&feature=youtu.be)

 I used her ideas and ideas from other videos and made my own version. It required just a bit of hand sewing. All I did was hem the bottom of the t-shirt (inside out).

You will see me say, I am not crafty, often, because I am not. But, I do find the creative ideas of others inspiring.


My First DIY T-Shirt Conversion - A Bubble Skirt

Ok, I had avoided the DIY YouTube videos.

 But, with a lot of time on my hands, I decided to tackle some projects I had on my To Do List #Z, the one with all the projects I never got around to.

 I have a few favorite t-shirts I had wanted to make into pillows, so since I am not crafty, I needed guidance. I did a search for t-shirt pillow on YouTube and wow! there were a lot of creative videos to choose from.

 I viewed several videos and choose a few and sorta combined the ideas to make a pillow.

 The pillow conversion was going to take some time, so I investigated some other t-shirt conversion videos to get more ideas.

Some of the other t-shirt conversions were easier. I mean so easy, you didn't even need to do any sewing. I decided to try a few.

 This video, FashionByAlly:

 https://www.youtube.com/watch?v=fLigeXKH5I0&feature=youtu.be

 is amazing. I could make a skirt without any sewing, so I did.


I used a large t-shirt.

 As with all things, I forgot to take a picture of the t-shirt or any of the steps.

I did not begin to save the videos with ref notes regarding what I made using the videos. So, my next DIY YouTube projects will be more informative.


Wednesday, June 24, 2020

It's Been a Week of Salvage Operations

This week, I attempted to salvage lettuce, sardine fishballs, and some papaya and pumpkin fruit.

On Saturday, I made two fishball recipes. Both were a flops. I had over 60 fishballs to salvage.


With some DIY Tartar sauce or a red sauce, they worked as appetizers.

Then, I got a craving for Tostadas. That required lettuce. So, I have been eating a lot of Tostadas this week to save the lettuce and fishballs.

On a store-bought tostada chip, I added a base of refried beans, a crumbled fish ball on top of a base, with a little red sauce or DIY Tartar sauce, shredded lettuce and parm cheese.

The red sauce and DIY Tartar sauce helped add flavor.

There was not much difference in taste between the two types of fish balls. Plus, there’s not much difference in the pictures, either. I am too embarrassed to show the assembly of ingredients.

I can not afford to throw out these fish balls, so I will continue to look for ways to salvage them.


While I enjoyed these fishball Tostadas, another savage operation was a great success. Chicken Soup with pasta and a crumbled fishball.

The base of the soup was made from a previous Chicken broth recipe. The pasta was precooked and flavored with olive oil and basil. I just added the pasta and crumbled fishball to the broth. The fishball was like a dumpling.

Then, I thought about that bit of papaya fruit and pumpkn puree I had in the freezer.

Let's see if I add some plain yogurt, could I make mousses? Yes, I can.


Over the last five days, I saved 60+ sardine fishballs (some are frozen, will see how they work after thawing), a 1/2 head of lettuce and some frozen fruits.

#GERD-friendly


Wednesday, June 3, 2020

Utterly Putterly - New Use for Insulated Beverage Container

It is the simple things in life that can make you happy.

I like cucumbers. I especially like to pickle them. But, occasionally, I'll keep one cucumber to make snacks and salads. But, one drawback is cucumbers don't keep long and you can't freeze them.

While I try storing them in the vegetable bin, it just seems they go bad too quickly.

On 5/28/20, I got a big beautiful cucumber (.415/kg, 43.50 / 18.05).
After a day or two, I made a small cucumber salad and some snacks.

Now, here I was with 3/4s of a cucumber I wanted to save for more snacks, salads or pickles. Could I find a way to make it last longer?

So, on 5/31/20, while I was washing dishes, I washed out a insulated souvenir beverage container. I sighed. Like many souvenir mugs or beverage containers, I did not often use this container. Do I give it away? No use keeping things you don't use.

Hmmm, would this hold the remaining cucumber? Would it help keep the cucumber fresh longer? Let's try it.


It works. So far, so good, been eating fresh cucumber snacks for two more days, now, and the remaining cucumber is still fresh.

I love the fact the container is compact and does not take up too much space in the frig.

Friday, April 24, 2020

A Puttering Passion

I use a lot of yogurt.

Here in Mérida, yogurt comes in a variety of sizes from small snack cups, to the popular 8.5 oz drink size, and to larger container sizes.

(Popular brands in Mérida: Yoplait, Danone)

I had a persistent problem. Often, I do not use all the yogurt in the 8.5 oz bottle and want to restore it in the frig. The little aluminum cover often tears, so it doesn't not work as a lid.

I have been looking for lid alternatives for years.

 I found one, today.

I use a cough syrup that comes with a cap you use as a measuring cup for the syrup. It fits perfectly as a yogurt lid.


 Hurray, for Puttering Passion!

While I save lots of plastic containers, I am not advocating for a lid for this yogurt. If you ever watched the film, Albatross, it really makes one want to eliminate all plastics.


Uh Oh, just one search for yogurt brands in Mexico and down the rabbit hole I go.

It makes me think of Yogurt Wars, whose brand makes it to the store shelves?

Found a recipe for making Yogurt that I can try.

Monday, April 20, 2020

Microwave: Mug O'Apple Bread Pudding

During the COVID19 quarantine, I am rummaging around in closets, drawers, cupboards, and the frig.

I had a tablespoon of canned apple pie filling in the frig that had been sitting around for quite awhile.

I usually have a heel of bread somewhere in the frig.
So, I decided to make a Mug O’Apple Pudding based on a prior Mug O'Bread pudding recipe.
All I did different this time was stir the mixture well before microwaving.


Microwave: Mug O'Apple Bread Pudding Recipe
(Adapted from: https://riastoneblog.blogspot.com/2016/12/mug-obread-pudding.html)


Ingredients:

1 8oz coffee cup
1 TB Canned apple pie filling
1 Slice of bread, torn into pieces
1 egg
1 1-2 TB sugar
2 TB milk or yogurt (I used lactose-free dry milk mix)
1 TB vegetable oil (or margarine)
1 tsp vanilla
2 Dashes of cinnamon


Process:

Add apple filling to bottom of cup
Break bread into pieces, place in cup.
In separate bowl, mix rest of ingredients
Pour mixture over bread.
Push bread down into cup so all pieces are soaked in mixture.
Stir and mix bread, fruit and egg mixture together.

Microwave 2 minutes on high.
Remove, let it cool for a bit before eating.


It tastes like apple crumb cake!
 
Variations: use other types of fruit or no fruit.
 
#GERD-friendly

Converting Jack's Peach and Chickpea Curry into a Toast Topping

As you can see, if you preview my blog posts, I follow Jack Monroe https://cookingonabootstrap.com/.

I have also bought most of her books. Like Amy Dacyczyn, author of the Tightwad Gazette, Jack encourages people on a limited budget with limited cooking skills that they, too, can make great frugal meals.

Here is Jack's original Peach and Chickpea Curry:
https://cookingonabootstrap.com/2019/11/05/peach-chickpea-curry-recipe/.

While this post is not an actual recipe, you can go to Jack's website and try her recipe.

I was skeptical about trying to make this recipe for several reasons. Because I need to adapt recipes to make them GERD-friendly and according to available supplies, I wondered if I could actually achieve a curry.

Suffice it to say, adapting the recipe to make it GERD-friendly meant No onions, No garlic and No tomatoes. I tried to use a bit of onion and garlic powders. I tried to give it the tomato flavor by adding a few crumbles of tomato bouillon. If I use too much of any of these spices, my stomach rebels.

Well, it did not turn out the way I thought. So, I now I had a lot of peaches/chickpea mix left.

What could I do with this? First, I thought, I’d try to make the curry again by recooking a batch with additional spices. No, that won’t work, it would be too spicy.

Ok, let me sleep on it.

Then, I thought let’s see if it works as a toast topping. So, in the morning, I spread some cream cheese on a slice of toast and topped it with a 1 1/2 tablespoons of the peaches/chickpeas mix. It worked! It’s great. Hurray, another save!


#GERD-friendly